Monday, October 31, 2011

Pumpkin Pumpkin on my Mind

I wasn't going to carve the Pumpkins this year.  The kids are teenagers and weren't too interested so I figured I'd just enjoy having pumpkins on the porch, not Jack-O-Lanterns.  No problem, they'd look autumn-ish all fall and the they serve as appropriate decorations until Thanksgiving. 

BUT I just couldn't let them be.  We didn't pull down any of our typical Halloween decor this year, no 4ft dancing ghosts, no egg crate spiders, no Mr. Bones the skeleton made out of Milk Cartons.  So, at 5:00 on Halloween night - I decided to carve.

I had to do something cute, right?  So I made vegetarian Jacks.  One is eating an apple and one is munching carrots between his toothless gums.  I'm pleased.

They look like this:


So, as I was carving, I smelled the pumpkin and realized I wanted to EAT something pumpkin, so I prodded around the internet and came across this yummy looking treat. 


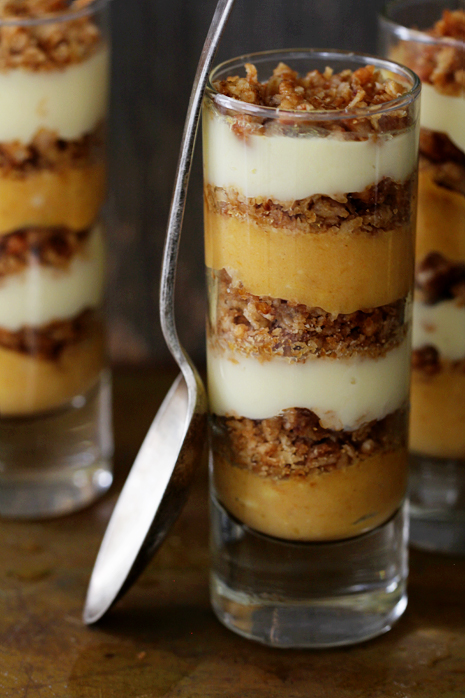
Pumpkin Praline Trifle Bakers Royale 2 Pumpkin Praline Trifle

I haven't tried this recipe but I thought I'd post it anyway. I will buy the ingredients next week and give it a go.

Click here for the recipe.

If you try it before I do - let me know how it is!

Dark Chocolate Pistachio Bark

For the past two weekends, I've attended or hosted a lot of events that required me to provide a bit of dessert.  I chose Chocolate bark.  This recipe is the second of two varieties I made.  I also made Halloween bark.  You can find that recipe post HERE.


To create dark chocolate pistachio bark, I melted two 7oz 72% dark chocolate bars from Trader Joes using the double boiler method.

When the chocolate is melty and smooth (don't burn!), pour it onto the center of a cookie sheet or jelly roll pan that is lined with parchment paper.  Spread it around evenly.  I achieved this with the back of a metal spoon.

Sprinkle pistachio nuts across the melted chocolate.  Follow the nuts up with broken pieces of extra thin salted pretzels.  Then, add chopped walnut pieces and finally sprinkle on some coarse salt. 

After hanging out in the fridge for a few hours, your tray of chocolate bark should look like this:


Break it into pieces with your hands and put it on a plate.  Ready to eat!  AND delicioso!  Give it a try!


YUM!

Halloween Bark

Halloween Bark is the perfect Halloween treat.  It incorporates CANDY, CHOCOLATE and SALT!  What more could you want in a holiday treat.  Oh yeah, did I mention it's really easy to make?  This recipe was adapted from one I found HERE.


I used 7oz of Trader Joes white chocolate bar and a 12oz bag of white chocolate chips.  I used the double boiler method to heat them, placing a metal bowl over a pot of simmering water.  The chocolate melted easily.  Don't over cook it - remove it as soon as it's pourable.

Line a cookie sheet or jelly roll pan with parchment paper.  Pour the melted chocolate into the center and spread with the back of a spoon to smooth it evenly across the entire pan from edge to edge and corner to corner.


Then, evenly distribute candy corn across the tray, landing it onto the melty chocolate.  Next, break apart Halloween oreos (I used Trader Joes Halloween Joe Joes) and drop them onto the chocolate.  Thin chocolate pretzels (salted!) can then be broken apart (I just crunched them in my hands) and added.  Finally, sprinkle Chocolate and/or orange sprinkles - I used a brown and orange Halloween blend with little black bats.

I used a square of waxed paper to slightly press all the goodies into the chocolate to make sure they would stick and not come loose.  Don't press so hard that you bury them.


After a few hours in the fridge, remove the giant pan of bark and break it into pieces by hand.

Easy Peasy!

Tuesday, October 18, 2011

Universal Craft Blog Directory


Click the button above to add to the ultimate Craft Blog Directory.
Come now - spread the love.

Sunday, October 9, 2011

Fall Flowers around the Yard

Finally - the sun has come out and we can have some proper fall weather, cool and crisp when it's early and late and sunny and beautiful during the mid day.

Even though the weeding has gone by the way side, the summer flowers have continued to stretch toward the autumn sun.  I captured a bit of the splendor.  Enjoy!


Saturday, October 8, 2011

Crochet Tutes Coming soon...

I've been crocheting.  Really, I have.  I've been taking photos along the way with the plan to post tutorials about the projects as well... but, I'm not done.

Here's a sneak peek...

Friday, October 7, 2011

Garden Keeps on Growing


With all the rain we had this year I figured my garden would produce a bumper crop - but then, it didn't.  The squash bugs ate through the cucumbers AND the zuchini - irritating little buggars kill my vines every year!!!  The tomatos, eggplants and bell peppers had a lot of little green things that the squirrels seemed to enjoy a single bite of.  Nothing seemed to be rippening. UGH. I've been gardening for years and I do love to eat things right out of my own soil, but really, I just wing it when it comes to real veggie garden knowledge.

However, even the dried up leaves and knarly vines keep producing stuff - so I gather and I cook!

Here's the collection from a few weeks back (turned into an awesome vegetarian shepherd's pie):


Then, another loot haul from yesterday...


Next year - I'm not giving up, but I'm going to try some new things... onions, garlic, asparagus - maybe the squirrels won't like those things - they do tend to leave my yummy jalapeno peppers alone!


Thursday, October 6, 2011

How to Grow Pumpkins


Last year in late November my husband said... "What's this pumpkin out here [back porch]; is it something you're saving?"  Just then he lifted it from the table and the rotten guts spilled out.  I'd put it out there a month before and it rotted.  He scooped the mess between a few pieces of card board and threw it into the area of the yard where we chop wood and let it age.

The soil is pretty good in the mostly unused corner of the yard since so many logs lie there to dry out.


This summer when I was hanging the laundry I noticed a long, viney plant wending it's way between the fence posts toward the driveway.  Looking over the fence, I saw that it was a squash variety of some kind.  I figured it would just die, it looked weak and spindly.


On through the summer it grew, spreading in several directions and then producing yellow flowers.  I wasn't sure what it was.  Soon the flowers disappeared and little green orbs came out.  My husband shouted to me one day that he thought we had watermelons.  Hmm I thought, little late in the season for those to be just budding.


On it grew.  We've had A LOT of rain, so I've been hanging the laundry INDOORS - this week I visited the laundry line and low and behold, PUMPKINS... 5 or 6 of them.  They are mostly turning orange now though they are small.  I saw a squirrel scratching at one.


I called my youngest son outside, took some photos of the cute little babies on the vine and let him have a go at them with the garden loppers.  We snipped off three and decided to see if the others would still grow some more.


Aren't they cute?  The coolest thing about it was that I wasn't even TRYING to grow them - LOVE IT.  I guess there are good things about pumpkin goo being too much of a mess to make it all the way to the compost bin!


Happy Halloween

Tuesday, September 27, 2011

Paint Chip Chain Links for Fall Decor


Need to add a little fall decor but don't have much time or money?

This is a fast, easy and super cheap craft.  Use fall color paint chips to create a chain link to loop anywhere you need a little fall pizazz.

1. I chose green and brown multi color chips from past painting projects to make this one.


2. Fold the strip in half (so both sides have paint chips rather than words).


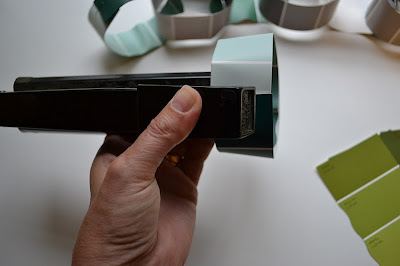
3. Bring ends together.  Hold and staple - just one staple is plenty.


4. Fold next strip.  Insert into first loop.  Complete step 3.


Repeat step 4 until your chain is the length you want.  Hang to create a fall display or decorate for a party in a pinch!

Monday, September 26, 2011

Tombstone Bunting


The first time I saw the Creative Memories Tag Maker, I thought - hmm... tombstones! and Halloween Fun.  I've made several scrapbook borders for Halloween Scrapbook Pages using the tool but today I made a Tombstone Bunting.

When I'm done with a painting project, I stash away my paint chip samples.  I'm never sure what I will do with them but these days EVERYONE has the same idea and paint chips are indispensable in the craft world.  Today I went for the pile of GREYs.

Don't have a Tag Maker? CLICK HERE TO SEE AND BUY the Tag Maker.

This project is VERY easy.  Here's what to do.

First, turn the tag maker upside down and insert a paint chip.  I've used single color chips as well as multi-color chips.  Squeeze the maker and out pops a tombstone.


Next, use your creativity to create funny or frightful epitaphs for your tombstones.  I also adorned mine with R.I.P. and cross symbols and fake dates.  If you need a little help in the epitaph department, just google "funny epitaphs" or "Halloween Tombstone sayings" and you get a slew of pages full of creative lists to use.  I drew on my paint chips with Sharpie Markers.  I tried a few in silver, but black seemed to show up the best.


Line up your tombstones and begin to string them.  I used a heavy duty weight black thread and the smallest needle that could poke a small hole but that had an eye big enough to fit the thread through.  The biggest stitch of thread is behind the tombstone. 


Once all the pieces have been added, lay the long strand of tags/tombs out on the floor and slide them so that they are evenly spaced.  Create even thread extending from both ends of the bunting.


Hang or suspend your bunting for all to see!


Easy - Fun.  Give it a try.

Friday, September 23, 2011

Crochet Tools Case


Need a great place to keep the little tools you use for crochet?  What could be better than a little Crocheted Tools Case?  Try this!

Are you a beginner at crochet?  This project will be perfect for you.  When I was brand new at crochet I had a lot of trouble finding useful projects that were simple to make.  This one will be no trouble.

However, if you are a more advanced crafter, you can add more difficult variations that make the project more challenging.

FIRST... you will need the following: 
  • worsted weight yarn (I used the cheapest type I had on hand - RED HEART 100% acrylic).  Beginners can choose a varigated skein to add lots of color without having to know how to change color yarn.
  • optional worsted weight contrasting color yarn for whipstitching details
  • large needle (to weave in ends and whip stitch sides)
  • scissors
  • size K crochet hook (6.5mm)
  • measuring tape or ruler
  • button
  • pearl cotton
  • embroidery needle
Here's how:


Create a foundation row of chain stitches (22 stitches).  Add one additional chain as a turning chain.  Turn your work.

Single crochet to the end of the row.  Chain 1 to turn.  (count to make sure you have 22 single crochets).


Continue making rows of 22 stitch single crochet until your piece measures ~14" in length.  (the width should be about 8 inches depending on how loose or tight you crochet) Finish off.


Lay your crocheted piece wrong side up.  (don't know which side is right or wrong?  look at your beginning tail string.  if it's to the left it's right side up if the beginning tail string is to the right it's wrong side up)  Fold the bottom part up about 5 inches.  Pin the both sides of the folded pieces together using T-Pins.


Thread a large dull needle with either your coordinating yarn (my example uses red cotton worsted weight) or the same yarn.  Starting at a either bottom fold, whipstitch the two sides together.  Here's a link for more info about doing the whipstitch with crochet.


Continue whipstitching over the top of the piece and then down the other side.  End your whipstitch yarn inside of your pouch.  The whipstitching can add a decorative detail to your piece.

Next, find a button that will fit through one of the single crochet stiches in your piece.  I just found an old button in my craft box.  Fold down the top of your tool pouch.  Use a T-Pin to mark the best location to sew a button onto the folded pouch.  Use embroidery floss or pearl cotton and an appropriate hand sewing needle to stitch the button onto the crochet pouch.  Tie off the knot on the inside of the pouch.


Slightly stretch one of the crochet stitches on the flap of your tool pouch in a place where the flap will naturally align with your button.  After buttoning and unbuttoning your pouch flap a few times, the hole will be easier to use.

I made a removable felt pocket insert for my pouch.  The felt pocket insert is optional.  If you just want to use the pouch without the felt pocket, add your crochet tools to the pouch.

Here are some tools that I like to use inside my pouch:  crochet hooks, scissors, tape measure, row counter, etc...


I also like to use the crocheted area under the flap to hook my stitch markers, T-Pins and large eye needle.


If you'd like to make the removable felt pocket, here's how:

Cut a piece of felt to 8"X7"  (I used red craft felt which is very cheap - you can also use a wool blend felt which is stronger and softer or a piece of a felted sweater). The photo below shows the felt before I trimmed it to size.


Fold the felt in half so it's 7" wide and 4" high.


Use an appropriate embroidery needle and a piece of pearl cotton thread to stitch a running stitch 1/4" from each side.  I made a loop stitch go over both the top and the bottom of each side.  End your stitch on the outside with a knot and trim it close.


Because I used craft felt which tends to stretch and pull, I made a blanket stitch across the top of each side of the pocket insert.  The blanket stitch also adds a decorative detail.  Here is a link explaining how to do a blanket stitch from futuregirl.  Use coordinating or contrasting color of thread for the blanket stitch.


NOW, your pocket is complete.  Because I wanted to store pointed scissors and small-ish crochet hooks in my tool pouch, I added the felt insert so those items wouldn't poke through the crochet stitching.


Are you a more advanced crocheter?  Consider changing colors while crocheting your pouch to create stripes or other designs.


If you make a crocheted tool pouch - post a photo of it on the Fly the Coop Crafts Facebook Page! I'd love to see your creations!
Related Posts Plugin for WordPress, Blogger...