
Today, the weather is PERFECT. It’s still warm and will reach a high of 71F degrees. The sun is shining and the air is crisp and clean. Today, my front door deserves its new décor, autumn décor.

I like seasonal change and am glad to live in an area of the world that has four seasons. Autumn (aka fall) is probably my favorite. Even so, I have enjoyed my brightly colored flowery crocheted wreath SO MUCH, that I was hesitant to change it out with something more befitting of the season. But I did. AND, I think I MIGHT just love it MORE!

Maybe you read about my Spring/Summer wreath in THIS BLOGPOST HERE.

Keep reading, if you like my Autumn Crochet Wreath, you can make one to grace your own door! I’m sharing the how to right here in this post.
First, the inspirations. . .
1. I was hanging the laundry and glanced down at the unknown squash vine that had sprung up from some rotten pumpkin/squash/gourds I’d buried in the spring. Right next to the fence was the CUTEST little yellow gourd. It survived the squirrels, wove itself through the fence and presented itself at my feet. I picked it. It was so cute, I knew it was time for a new wreath. I love how bright and yellow/orange the gourd is. It’s fall colors are apparent but its brightness was unexpected.

2. Scrolling through PINTEREST, I found some brightly colored crochet flowers from someone’s ETSY site. I don’t normally save ETSY pins because I’m usually looking for patterns, not purchases, but I saved this pin for its color inspiration. My vision of my wreath was building. I also liked the shape of the ETSY flowers, their large dark middles and their floppy petals just looked like fall to me. They reminded me of something between a sunflower and an mum.

Next, the how to…
I decided to repeat the same TYPE of wreath I had made for my spring/summer wreath, so I followed my own wreath pattern here. I used 3 colors of I LOVE THIS YARN (by Hobby Lobby). It’s worsted weight acrylic. I was encouraged to use it because it’s lovely to work with – aka not splitty. I was also happy with how well my spring/summer wreath held up on the door, so I knew I’d get a good result. I chose a burnt orange color, a dark-ish green and a mellow yellow. I used a 4.0mm crochet hook.
I crocheted the two sides of the wreath identically. Then, with wrong sides together, I used the yellow and crocheted the two insides of the wreath together. I used a single crochet and went through both loops of the inner edges of the wreath. I then added a second row of single crochet. I didn’t decrease any stitches on the second row.


Thinking back to the ETSY flower, I constructed a similar flower and created a pattern that gave me the look I wanted. I used autumn colors of cotton yarn, mostly dk weight, for the appliqués. I used the same 4.0mm hook for all of the appliqués.
I’m calling this flower Little Mum.
I’m calling this flower Little Mum.
NOTE: All my patterns use American Crochet Terminology

Little Mum:
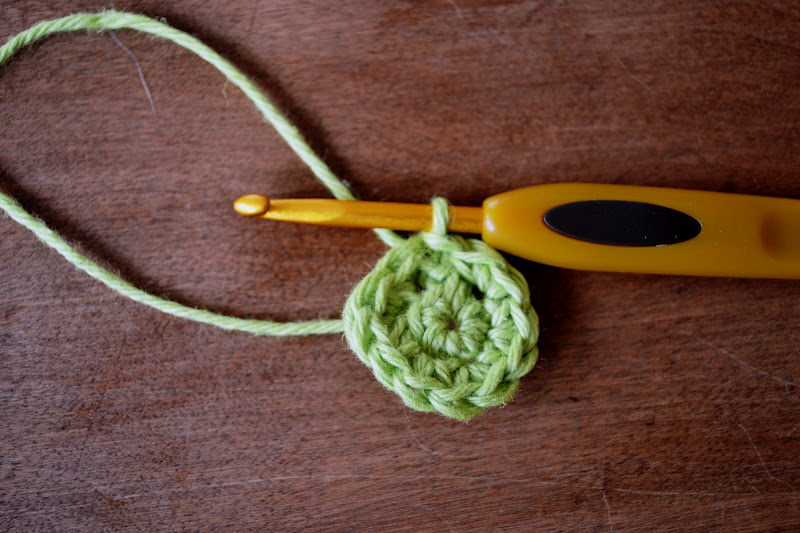
With dark khaki green, Classic Cotton dk, make a slip knot and chain 2.
Round 1. 6 sc in 2nd chain from hook, sl stitch to join w/ 1st sc
Round 2. 2 sc in each stitch from round 1 (12 st). Slst to join. Add new color (I used light khaki classic cotton dk).
Round 3. *Ch 2 (counts as hdc), 2 dc, hdc in same stitch, sl st in next 2 stitches, repeat from * until 6 petals are formed, fasten off.
The Little Mum is about 1.5" X1.5" in its finished size. Flower size will vary with yarn weight and hook size chosen.
The Little Mum is about 1.5" X1.5" in its finished size. Flower size will vary with yarn weight and hook size chosen.
I wanted flowers of varying sizes. So I created a flower pattern that is bigger and uses brighter colors. I used five of these bigger flowers in my final wreath. Three have green centers with yellow petals, one has a yellow center with green petals and the last has a khaki center with red petals.

I am calling this bigger flower Big Fall Mum: ( I got a little carried away with my flowers and made them different petal sizes…added more stitches to rounds 2 and 3 so I could add more petals or an extra slst to remove a petal – the original size has 9 petals)
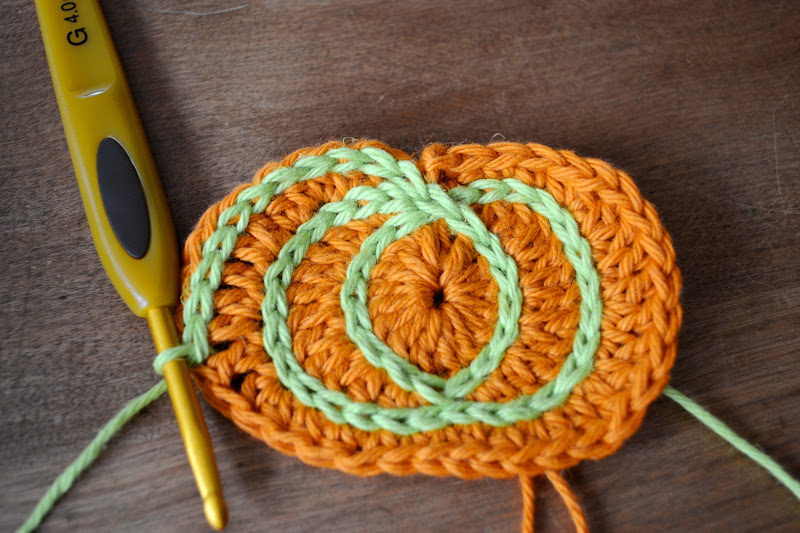
Round 1. Ch 2 with color for flower middle. 6sc in 2nd ch from hook. Sl st to join with 1st sc


Round 2. *2 sc in each stitch (12 st), join w/ sl st in first sc.
Round 3. Ch 1, sc in same stitch, * 1 sc in next stitch, 2 sc in next stitch. Repeat from * and join w/ sl st when you get to the first ch of round. (18 st)

Round 4. Join new color for petals. Ch 1, sc in next stitch and in all remaining stitches in round (18 st), join w/ sl st in first ch of round.
Round 5. *Ch 2 (counts as hdc). 1 dc, 2tc, 1 dc, 1hdc in same stitch. Sl st in next two stitches, repeat from * until 9 petals are formed. Join w/ sl st to 1 ch, finish off
The yarn I used for the yellow and green big fall mums is Knit picks Cotlin dk in chartreuse and canary. I also used CotLin dk in tomato for the red petals and the Classic Cotton dk in light khaki for the middle of that one.
The Big Fall Mum I made is about 3" X 3" in it's finished size.

The yarn I used for the yellow and green big fall mums is Knit picks Cotlin dk in chartreuse and canary. I also used CotLin dk in tomato for the red petals and the Classic Cotton dk in light khaki for the middle of that one.
The Big Fall Mum I made is about 3" X 3" in it's finished size.

Next up – a few Pumpkins (my little gourd was the inspiration for these). The yarn I used was Knit Picks CotLin dk in clementine, chartreuse and canary, for the stem I used a ball of Martha Stewart worsted weight cotton in light brown.
Round 1. Ch 4 (counts as first chain plus dc). 15 dc in first chain, sl st into 4th chain of starting ch4). (total of 16 dc stitches counting the first chain 3)

Sc in next stitch,
hdc in next stitch,
2hdc in next stitch,
hdc in next stitch,
2 dc in next stitch,
dc in next stitch,
2dc in next stitch,
dc in next stitch,
2 hdc in next stitch,
hdc in next 2 stitches,
sc in next 2 stitches,
hdc in next 2 stitches,
2 hdc in next,
dc in next,
2 dc in next,
dc in next,
2dc in next,
hdc in next,
2 hdc in next,
hdc in next,
sc in next 2,
sk 1 stitch,
sl stitch into dip at top of pumpkin.

Detailing: Next, I added “ribs” to the pumpkin. Ribs use slip stitches that go through the pumpkin.


Start at the top of the pumpkin and enter the stitch space between rounds 2 and 3. Poke the hook from front to back into the pumpkin at that place. Wrap the new color yarn around the hook so you pull one loop through to the front of the crochet.


Next, push the hook through the next stitch front to back, yarn over, pull the second loop to the front and through the first loop. Repeat the slip stitches in each stitch space between rounds 2 and 3.

When you get to the bottom of the pumpkin, continue stitching between rounds 2 and 3 from the bottom, around the right side and back to the top of the pumpkin. When you get to the place you started, continue on around the left side of the pumpkin working in the stitch spaces between rounds 1 and 2.

Continue all the way around the right side of the pumpkin and up to the starting point. At the top of the pumpkin, continue a final row of stitches towards the outside of round 3.

When you get to the bottom, make one stitch into the stitches above and then dip back down again to continue aroud the right side of the pumpkin. The dip will accentuate the fact that the pumpkin isn’t perfectly round.

Pumpkin Stem: Chain 5. Sc into the 2nd chain from the hook and each remaining chain. Fasten off. Leave 2 tails, each about 3 or 4 inches long. Pull each tail thru the pumpkin from front to back at the center top of the pumpkin. Tie the tails together. Weave in ends.
Next, I decided to add apples to my wreath. I am calling the apple appliqué Wonky Apple. The apple is not really that wonky, but it’s not perfectly symmetrical, as I don’t find apples to be perfectly round, so I wanted it just a bit off.

Wonky Apple:
Round 1. Ch 4 (makes first chain plus 1dc). 14 dc into first chain made. (total 15 dc) Join w/ slst to top of first chain 4.
Round 2.
Sc into next stitch, hdc into next stitch,
2 hdc into next stitch,
2dc into next st,
dc into next st,
hdc in next stitch ,
slst in next stitch,
hdc in next stitch,
2 hdc in next stitch,
dc in next stitch,
2 dc in next stitch,
2 hdc in next stitch,
hdc in next stitch,
sc in next stitch,
sl st in next stitch. Finish off.
Stem: Join new color at top center of apple. 5 sc. Sc in 2nd chain from hook and rest of sc, sl st into top center of apple, finish off.

Remove each appliqué one by one, weave ends in towards the middle but don’t cut them off. Thread them through a wide-eyed needle and pull them through the wreath. Tie the ends together to hold the appliqué in place.

Once all appliqués are tied down, they will be easier to keep in place in order to stitch them down more securely. For the stitching I used strands of embroidery floss and pearl cotton that matched my yarn colors as closely as possible.
Because the wreath is still open on its outer edges, it is easy to work between the layers of the wreath to sew them down.
With each appliqué, leave a 3 inch tail of floss when you start stitching. Take your thread through the inside the crochet stitches so the floss won’t show.
I like to fully secure each appliqué but I also leave some edges and petals somewhat detatched so the pieces have movement. When you've sewn the entire applique, tie together the 3 Inch tail with the other end of your floss. You don’t need to clip the ends close as you can just tuck all the threads in between the wreath and the cardboard donut. They won’t be seen.

When all the appliqués are stitched down, single crochet around the outside edge of your wreath to close it. Make sure to tuck in all loose ends and yarns as you go. I used on single crochet row to close the wreath. I went through both loops of each single crochet on both sides of the outer wreath edge. You can add a second row of single crochet if you prefer a thicker outside edge.
For the hanging hook, chain 21. SC in the 2nd chain from hook and all other chains to end. Join the two ends with single crochet. Leave tails. Attach the hook to the back side of the wreath at the top. Weave in all ends.

TaDAH! Happy Autumn Crochet Wreath!


