Thursday, December 5, 2013

NYC Visit

Yesterday I visited NYC.  It's only about 1.5hrs from where I live but still, I don't get there much.  In fact it's been a few years since I visited.

Yesterday a girlfriend and I hopped a bus from our neighborhood and took a jaunt north to see the holiday sights and sounds of the BIG apple!  I always forget HOW much bigger it is than Philly - it's A LOT bigger, I mean MUCHO MEGA!  AND.... there are loads more people.  Especially at this time of year...so many people.  AND... the entire city really gets decked out for the holiday season.

The trip was WAY too short and I felt like I literally ran from place to place all day.  Here's what I saw, a tiny little glimpse of NY sparkle and shine, enjoy!


Horn blower near St. Patrick's Cathedral


Angles lining the walk way to the tree at Rockefeller Center.


Lego depiction of Rockefeller Center at the LEGO store.


Lots of lego sets.


The tree at Rockefeller Center.  The city was getting ready for the tree lighting ceremony later in the evening.


Windows outside Saks 5th Avenue.


Decorated tree at Bryant Park market.


Little ice rink at Bryant Park


Selfies in front of the tree decor


Seriously the BEST cappuccino.  I so love that frothy yummy thick creamy goodness in my coffee and it was practically a soup bowl full.  My friend Karen got one too... and we each treated ourselves to a pastry.
  

American Girl Store.  I used to love buying new outfits for my daughter's American Girl dolls every Christmas.


A brisk walk over to Herald Square.  It was nearly 50 degrees out, balmy for December.  Just right for enjoying a little outdoor chill.


The famous MACY's store from Miracle on 34th Street.


 The holiday windows were not as magical as I remember them.


Had to get the 34th street sign.


We took the escalators all the way to the 8th floor to walk through Santaland.  Last year I walked through the Dickens holiday land at the Macy's in Philly.  You can read that post here.

Santaland is very..."dated."  The coolest thing about making the trek up there to walk through was getting to ride on the original wooden escalators in Macy's.  They are awesome.  You just don't see wooden escalators anymore - I would have taken a photo but they were packed with people.


I took photos of the goofy displays in Santaland to pass the time while the line moved slowly along towards Santa himself.  We didn't continue on thru with the little kiddies to sit on Santa's lap.


I thought the tree was kinda creepy.


We stopped on the first floor of Macy's to make my ONE xmas gift purchase of the day.  Then, we headed off to Times Square.  There was quite a lot of construction going on - possibly re-doing things in time for New Years?


Most of the people who came on the bus with us had come to NYC to see the Rockettes Christmas show Radio City.  SO... since our bus was heading back to Philly a bit earlier than planned to avoid the heavy traffic from the tree lighting, we decided to catch a bite to eat near our pickup spot a few blocks from Radio City.

On the way to the restaurant, we passed by really big holiday displays outside of the different buildings.
First we saw a huge string of Christmas lights that reminded me that our decorations have not even come down from the attic, nor have the Halloween boxes made it from the upstairs hallways back TO the attic... 


Just past the big lights were a big pile of ornaments.


and soon after in the next block were a row of giant nutcrackers.


The displays were as giant as NYC itself.


Here is one of the big nutcrackers up close.


We ended the night with some really yummy and strong mojitos which helped (or maybe not) to get us back to the bus pickup, dashing through the crowds of people already lining up for the tree lighting, we boarded the bus and rode back out of town and back to Philly.

Next time I head to NYC for the holiday season, I think I'll stay over a night and give myself a chance to slow down and explore a bit more and not just rush rush rush.

Wednesday, November 27, 2013

Crochet Christmas Tree with Bells

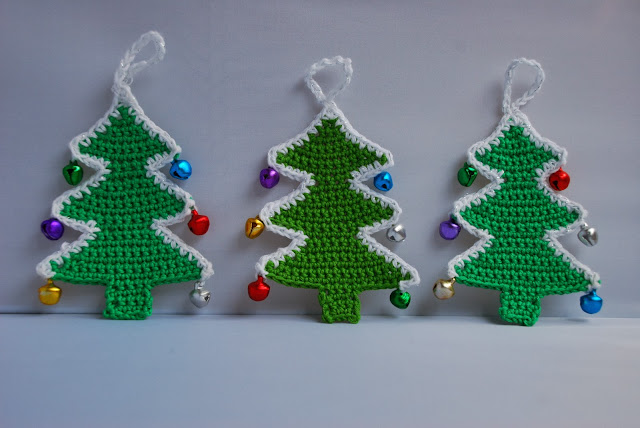
Don't you just LOVE IT when you find a blog and you are just constantly inspired by the creations that are shared there?  I have really been enjoying Amanda's blog called Amjaylou.  She just posted a pattern with photo tutorial (always super helpful) for Crochet Christmas Trees with little bell ornaments that would be perfect and quick for a holiday gift.

image of three crocheted Christmas trees

Click on the Christmas Tree photo above to take you directly to her pattern and photo tutorial.  While you are there, peek around a bit.  I think you will like what you find!

Happy Merry - Sher

Saturday, November 9, 2013

Poinsettias: A Crochet Tutorial

Finally, there is enough sun out that I was able to re-create and photograph the step by step process of making a crochet poinsettia.  I've put together this little tutorial for you - I hope you enjoy it!


Last year, I looked all over blogland and pinterest in hopes of finding a crochet poinsettia tutorial.  But, although I did find some pretty ones, I just couldn't find the one that I pictured in my head.  I did find ONE pattern that looked something like what I was envisioning but the pattern required me to make MANY many parts and then hook them all together (like over 15 parts ugh).  I wanted something simpler and with fewer parts.  The pattern I came up with has three parts.  The red part is the poinsettia bloom.  The green part is the poinsettia greenery and the white part is the poinsettia middle.  I borrowed the pattern for the middle from another blog.  The red and the green part I created myself.

The parts can be made in any order.  For this tutorial, I'm starting with the red part (the flower).  You are welcome to experiment with colors of course.  I have seen poinsettias in a variety of colors.  They bloom in all shades of red, pink and white!

Begin EITHER with a magic adjustable ring OR chain 3 (or 4) and join w/ a slip stitch.

Round 1: Into your ring ch1. Make *2sc then ch2. Repeat from * five more times.  After the last ch2, join with a slip stitch to close the round.  If you have used a magic ring, pull the tail to close.

The photo above shows the magic ring start for round 1.  The bumps are the ch2 spaces.

In the next round we will make 6 flower petals.

Round 2: into the first ch2 space, *work the following stitches (sc, dc, tr, picot3, tr, dc, sc)**.  One petal made. Work the instruction from * to ** into every ch2 space.  (6 petals total for the round).  Join round with slip stitch.  Finish off.

Here is how the flower looks with one complete petal.

Here is how the flower looks with all the petals completed.

Voila!  The red flower part of your poinsettia is done - lickety split.  How fast and easy was that?

Next.  Let's make the green leafy part of the flower.

Get out your green yarn.

To begin the leaf part either make a magic ring or ch 3 (or 4) and join with a slip stitch.

Round 1: ch1, make 6sc into the ring.  If you used the magic ring, pull the tail to close.  

Round 2: ch1, make 2sc into each stitch from round 1 (12 stitches) and join with slip stitch.

Round 3:  *ch3, sk 1, sc into next stitch. Repeat from * to end of round and slip stitch to join.  You now have 6 chain3 spaces.  These spaces are where we will form the leaf petals.

Peform all of the following stitches into the first ch3 space (sc, hdc, dc, 2tr, picot3, 2tr, dc, hdc, sc).  I find that I need to "scooch" the stitches over to the right after making the second tr.  This helps to make room for the rest of the stitches on the ch3 loop.  Also, unlike the picot3 on the red part, I like to make the picot3 on the leaf part by making 3 chains and then slip stitching into the first chain made.

Work these stitches into every chain3 space in the round (sc, hdc, dc, 2tr, picot3, 2tr, dc, hdc, sc).

Slip stitch to join the round and finish off.  Poinsetta leaf part done!

Ta dah!  Leaf part with 6 leaf petals.

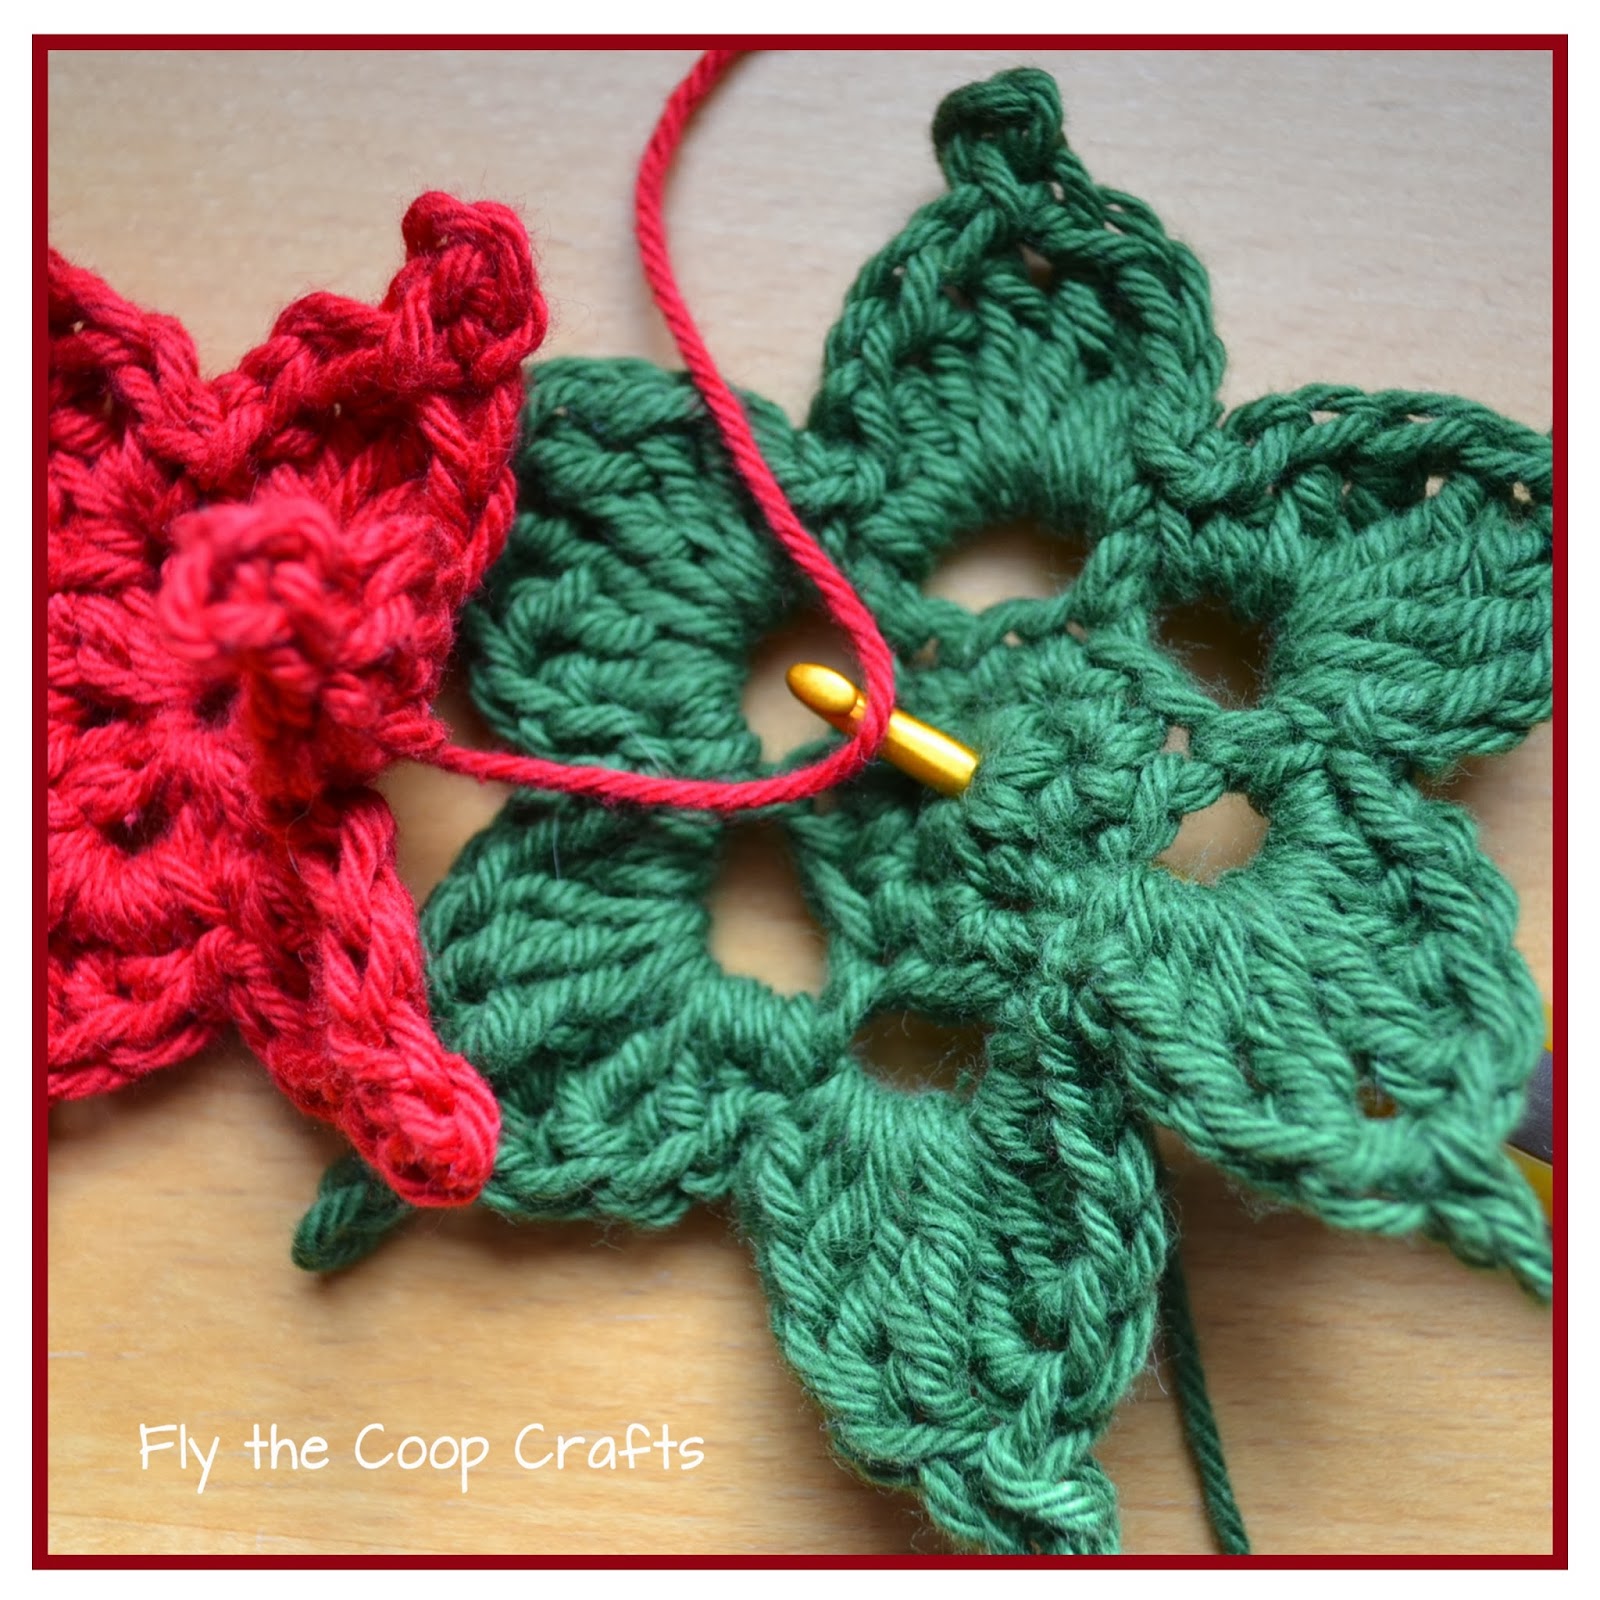
Upon assembly, the red flower petals will sit atop the green leaf petals like this:

To create the white ball for the middle of the flower, I used the little crochet ball pattern from Lucy at Attic24.  Lucy used the balls to decorate/trim her super fun lamp.  I thought the balls would be the perfect middles for my poinsettia.

Go HERE TO SEE THE CROCHET BALL PATTERN.

Here is a photo of the little balls from Lucy's blog:

IMG_6065

When you visit her blog post, look for this photo of the little balls.  You will find her written pattern explanation of how to make them right below the photo.  While you're over at Attic24, look around a bit.  Lucy has many, many lovely patterns and beautiful photos and stories about crochet.

To attach the parts of the crochet flower together, I first wove in the end where I finished off the yarn.  I used the tail from where I started the yarn and pulled it thru from one flower part to the other thus hooking them all together.

You will end up with three yarn tails on the underside of the flower when all three parts are connected.  I gave them a little tie with a knot to hold them together.  Depending on what you plan to do with the poinsettia motif, you may want to weave in all the ends but I left them dangling for now as I may use some of the poinsettias to attach to other projects and if so, I may use the tails to stitch or weave them.

I plan to use one or maybe two of my poinsettias as gifts and will make them into brooches.  I already have birthday gift plans for the brooch (tho. I should have already completed and mailed the gift before today)! Better late than never I suppose.

The poinsettias can be made in any size.  The sample in the tutorial was made with three colors of Dishie Yarn from Knit Picks.  The dishie yarn is a light worsted, 100% cotton yarn.

Here is the finished sample poinsettia.

I made a bigger poinsettia with this acrylic yarn.  It's a thicker worsted weight.  I will probably want to steam the acrylic version into a bit flatter of a motif.

For this poinsettia, I played around with the idea of making a FIVE petal leaf part instead of the SIX petal leaf part.  I prefer the one with SIX leaf petals.

For the third poinsettia, I went a bit smaller.

I used this carpet warp cotton.  You can read all about my carpet warp yarn on this post.

So what do you think - is it time yet for poinsettias where you live?

I am feeling a bit of a holiday tug with my crochet.  I still have lots of autumn and Thanksgiving ideas I'd like to create, but I feel like the holidays are already looming.  Though it's been cold here, I've managed to do without the heat as of yet.  I've been piling on extra layers in the house and drinking warm beverages to compensate.  We just had the chimney cleaned out, so we are ready for the fireplace!

Hope you enjoyed my poinsettia tutorial.  Let me know if you make any of your own.


I may put a pdf download of this pattern on Ravelry - but that will have to wait for another day... too much work (real work) to do today!!!

Enjoy - Sher

Thursday, November 7, 2013

Goodies and Gifts from Blogland

Blogland is the most wonderful place.


I read blogs.  I get to know their authors.  I listen to their tales, their stories, their happiness and woes.  I learn from them, am inspired by them.  I get patterns, tutorials, and lessons from them.  I've never met ANY of them but I spend every day with them.  It's a strange and wonderful place, blogland.  Most of the time, the authors of the blogs I follow don't even know I exist.  If I leave a comment, they know I am following them and reading their words.  Sometimes I get responses and comments on my own blog posts and then I know that people are really out there, reading what I write, following my blog, being inspired by my patterns and lessons and tutorials.

Blogland involves a lot of invisible sharing.  Blogland is a strange and wonderful place.

But sometimes, blogland comes alive.  It flies across the oceans of this world and it arrives RIGHT at your doorstep.  Sometimes the bloggers, pop into your life in a personal and tangible way.  Sometimes this happens and when it does, it is even a MORE wonderful and amazing and happy place.

Blogland came to my house by the way of Linda.  Sweet, kind Linda.

I didn't know Linda.  I had never heard of Linda.  Linda's blog was not one on my daily list nor was mine on hers (tho. we both follow one another now).  But Linda and I had a blog in common... Attic24.  I always tell the students in my crochet class... if you follow Lucy at Attic24, you will learn about crochet from the world's most famous crocheter.  They laugh but I tell them I am serious.  Linda and I both follow Lucy and read her words and wait for her stories, and thrive on her crochet.  And there, in the Attic, we met.

It was in THIS POST BY LUCY.  The post is all about things that to Lucy are cosy (cozy in the USA).  In the post I saw the photo below.  These hot water bottle covers are all over crochet blogs in the UK and Australia and other places in Europe.  I've never seen one in the USA, I don't know anyone personally who uses one.  I wasn't really sure what people do with hot water bottles.

IMG_7110

So, I gulped.  Then I asked, publicly, in the comments section of Lucy's blog.  Within 24 hours, I had a personal email explanation from Lucy, I had many answers in the comments section from other Attic24 visitors BUT... I got a comment on my own blog from Linda who took it a step further and wanted to SEND ME an official UK Hottie!  I sent her my postal address and thanked her profusely at the offer.


But, guess what.  Linda didn't stop there... look what she did!


She wrapped up all kinds of goodies inside that package.  I could hardly wait to open them but I had to take the photo first.  Do you see the sweet wrap and tag with the flag in a heart.  LOVE!


WOW!  OH MY!  What can I say?  Too much goodness all wrapped up together and all for ME!!!  It wasn't my birthday or a holiday and it didn't even come from someone I know... can you believe this?  Shock, awe, amazement - all wrapped up.  Most of the items she had made - HAND MADE!


This SWEET little sachet with lavender was inside.  Can you stand how adorable those fabric prints and ribbons are?  LOVE. LOVE. LOVE.  Did I mention I love this?


And what about these awesome wooden buttons.  I will have to use them in JUST THE RIGHT project.

And even more.  I know, astounding right?  And I believe the little note book and needle book are both hand made.


But really, the piece de resistance...

Her beautiful crochet work.  The wonderful colors, the flower, the edging, the trim, the bow... what can I say.  No words are left.  I am floored, overwhelmed and TERRIBLY, undeservingly THANKFUL!

My husband came home and saw the pile of items on the dining room table and the overseas packaging sitting by its side.  I told him the story about the blog and the gifts and he simply couldn't believe it. Like me, he thought it was just the most wonderful thing!

I believe that Linda might just be off in Dubai to visit her family and grandson who have recently moved there.  Thank you, thank you, thank you Linda.  I love everything about this package and much much more!!!! (of course, you KNOW that I am already planning what I can send flying across the pond to YOU).

Up next, poinsettia pattern and tutorial, stay tuned. 

Related Posts Plugin for WordPress, Blogger...