Friday, October 4, 2013
Sherbet Waves Blanket
Hello!
The last time I posted it was back to school time - now it's full on Autumn (tho. today seems more like summer weather and my fall/winter clothes are still packed away in the attic).
At the end of the summer (and right before my vacation) I started a baby blanket project for my cousin. Her baby shower is this weekend. She is having her first baby, a girl. I could not attend the shower but my gift is somewhere riding in the back of a brown truck en route to the shower location.
The blanket is NOT a pattern of my own creation. I found the pattern on pinterest and saved it in my blankets and pillows board. You can follow me on Pinterest or just some of my boards if you'd like.
I didn't take many photos of the making along the way - not sure why. But it was a fun and easy pattern with a lot of color and texture and it was a joy to create. The name of the original pattern is: Wavy Baby Blanket and I found it here on Carina's Blog. The blog has the pattern in a non-English pattern but also a translation is included. I had no trouble following the translated version.
Here are the specs on MY version of the blanket which I have named Sherbet Waves. This Sherbet Waves blanket is of the girl variety as I would have chosen other colors for a boy. As recommended on the blog, I opted to use an odd number of colors in my pattern repeat. My pattern was an 11-color repeat.
The yarn I used is Red Heart Creme de la Creme. Although it is a worsted weight, I would consider it a light worsted. I used a G Hook (4mm).
I chose soft and bright girl colors and mixed those in with a variety of off whites and a khaki color. Though I cannot find my order form from the yarn and I have misplaced some of the skein wraps, my color repeat was:
off white (pink hue)
dark pink
off white (yellow hue)
lavender
khaki
off white (ivory)
light pink
khaki (the only color I repeated because I wanted more of this color)
bright yellow
true white
mint green
I didn't use an entire skein of any color, but almost. I used a bit more than one skein of the khaki ( I had 2 of those). I don't know the number of yards in the skein as it's not listed on the label but the skein is 70.9 grams and is a light-weight worsted, not quite as small as a dk or sport.
The yarn is 100% cotton, and though the finished product it a bit stiff, I think it will be less so after washing.
I'd suggest weaving in the ends as you go - the pattern calls for a color change at the end of each row. I didn't and had SO many to weave in at the end. UGH.
The reason this blanket isn't just a shell stitch blanket is because it has a row of single crochet in between each shell row. The pattern has a 4 row repeat which is easy to memorize after just a few stints thru. My finished blanket was about 32" long and 26" wide. I chained 142 stitches to start. You can do any length because the pattern is listed as groups of 14 + 2. The finished blanket had about 150 rows.
I love it when patterns list all their data like yarn and hook size and patter repeats, etc... it makes for SO much easier math if I want to change size or use different yarn so thanks to all of your who give lots of pattern data on your blogs. I find that when I add pattern data to my blogs, it gives me a great record to remember what I myself have done if I ever want to go back and use a pattern again.
I hope you enjoy this pattern - I will probably post a link to it on Ravely (follow me here) as well.
Labels:
baby,
blanket,
cotton,
Crochet,
girl,
Lessons and Tutorials,
Patterns,
Ravelry,
sherbet waves,
tutorial
Thursday, September 5, 2013
Kale Salad - SUPER YUM!
This summer I have eaten more kale than ever before in my life. Why? Well, blame it on the local farmer's market. Bunches of green leafy kale have been available all summer long and I've bought a bunch just about every week. I learned this recipe (tho. I've personalized it) from the farmer's market managers.
Kale salad is cold, uncooked kale thrown together with just a few other ingredients. It's simple and fast to make. Even if you don't THINK you like kale - try this.
Follow the photo tutorial for step by step salad yum.
Can you tell I'm not big on measuring?
This next step is great fun for the kids - even the littlest ones can help with this. Please wash their hands first! After you're done massaging your kale salad, you will have the fringe benefit of olive oil softened hands. WIN WIN.
I've had the kale salad in a sealed container in the fridge for about a week and it was just fine. One cup of raw chopped kale has your entire daily requirement of Vitamins A and C. It's also great for increasing your iron intake. Other nutritional benefits of kale are Calcium, B6 and magnesium. And believe it or not, that same cup of chopped kale has about 3grams of protein.
What's not to love? By the way, I've made this a few times when I was out of almonds. I've added pecans and/or walnuts to substitute. I've also used sunflower seeds. I've opted for golden raisins when I was out of the dried cranberries and used all manner of cheeses from Trader Joe's Unexpected Chedder, to other flavored cheddars or Trader Joe's cheddar gruyere and once even crumbled blue cheese.
Enjoy!
Next up - Pitt coasters!
Kale salad is cold, uncooked kale thrown together with just a few other ingredients. It's simple and fast to make. Even if you don't THINK you like kale - try this.
Follow the photo tutorial for step by step salad yum.
I ran out of Trader Joe's organic lemons and had to buy these at the regular grocery - good grief, what a difference, these looked great on the outside but were brown-ish and kinda dry on the inside.
Can you tell I'm not big on measuring?
This next step is great fun for the kids - even the littlest ones can help with this. Please wash their hands first! After you're done massaging your kale salad, you will have the fringe benefit of olive oil softened hands. WIN WIN.
I've had the kale salad in a sealed container in the fridge for about a week and it was just fine. One cup of raw chopped kale has your entire daily requirement of Vitamins A and C. It's also great for increasing your iron intake. Other nutritional benefits of kale are Calcium, B6 and magnesium. And believe it or not, that same cup of chopped kale has about 3grams of protein.
What's not to love? By the way, I've made this a few times when I was out of almonds. I've added pecans and/or walnuts to substitute. I've also used sunflower seeds. I've opted for golden raisins when I was out of the dried cranberries and used all manner of cheeses from Trader Joe's Unexpected Chedder, to other flavored cheddars or Trader Joe's cheddar gruyere and once even crumbled blue cheese.
Enjoy!
Next up - Pitt coasters!
Friday, August 16, 2013
Stitching History
Just popping in to share ONE little stitch! I took a trip down to Maryland last weekend to take part in this event. Check it out -
Way back when I first started my blog - I made several posts about my applique project. Of course - that is one LONG-TERM UFO that is currently sitting in plastic bags in my closed. Check out my applique quilt HERE and HERE.
If you'd like to read more about this flag project, try these links:
The Maryland Historical Society Flag Event
The Smithsonian's Exhibit about the Mary Pickersgill Flag
The Human Flag story at Fort McHenry
Upcoming Flag Events at Fort McHenry
I started a new crochet project - I'll be sharing that really soon!
Way back when I first started my blog - I made several posts about my applique project. Of course - that is one LONG-TERM UFO that is currently sitting in plastic bags in my closed. Check out my applique quilt HERE and HERE.
If you'd like to read more about this flag project, try these links:
The Maryland Historical Society Flag Event
The Smithsonian's Exhibit about the Mary Pickersgill Flag
The Human Flag story at Fort McHenry
Upcoming Flag Events at Fort McHenry
I started a new crochet project - I'll be sharing that really soon!
Sunday, July 14, 2013
Stained Glass Coasters - a tutorial
I have been busy. I haven't been busy with crochet. So I really NEEDED to get busy with some crochet. And I did. In fact, I wrote a little tutorial to share with you. AND... here it is.
So the other day, I was scrounging around in our "art room," (a room in the house that has evolved from being a kid's art room and then changed to a music and recording studio for my teenagers and then changed to a bit of a storage area) and I came across this:
I wanted a border around it so I made that addition.
And I wanted to re-create it and photograph the steps for a tutorial and now I have.
I sat here today and worked it all out for you.
And now I will present the step-by-step photo tutorial for the stained glass coaster. (Amer. crochet terms)
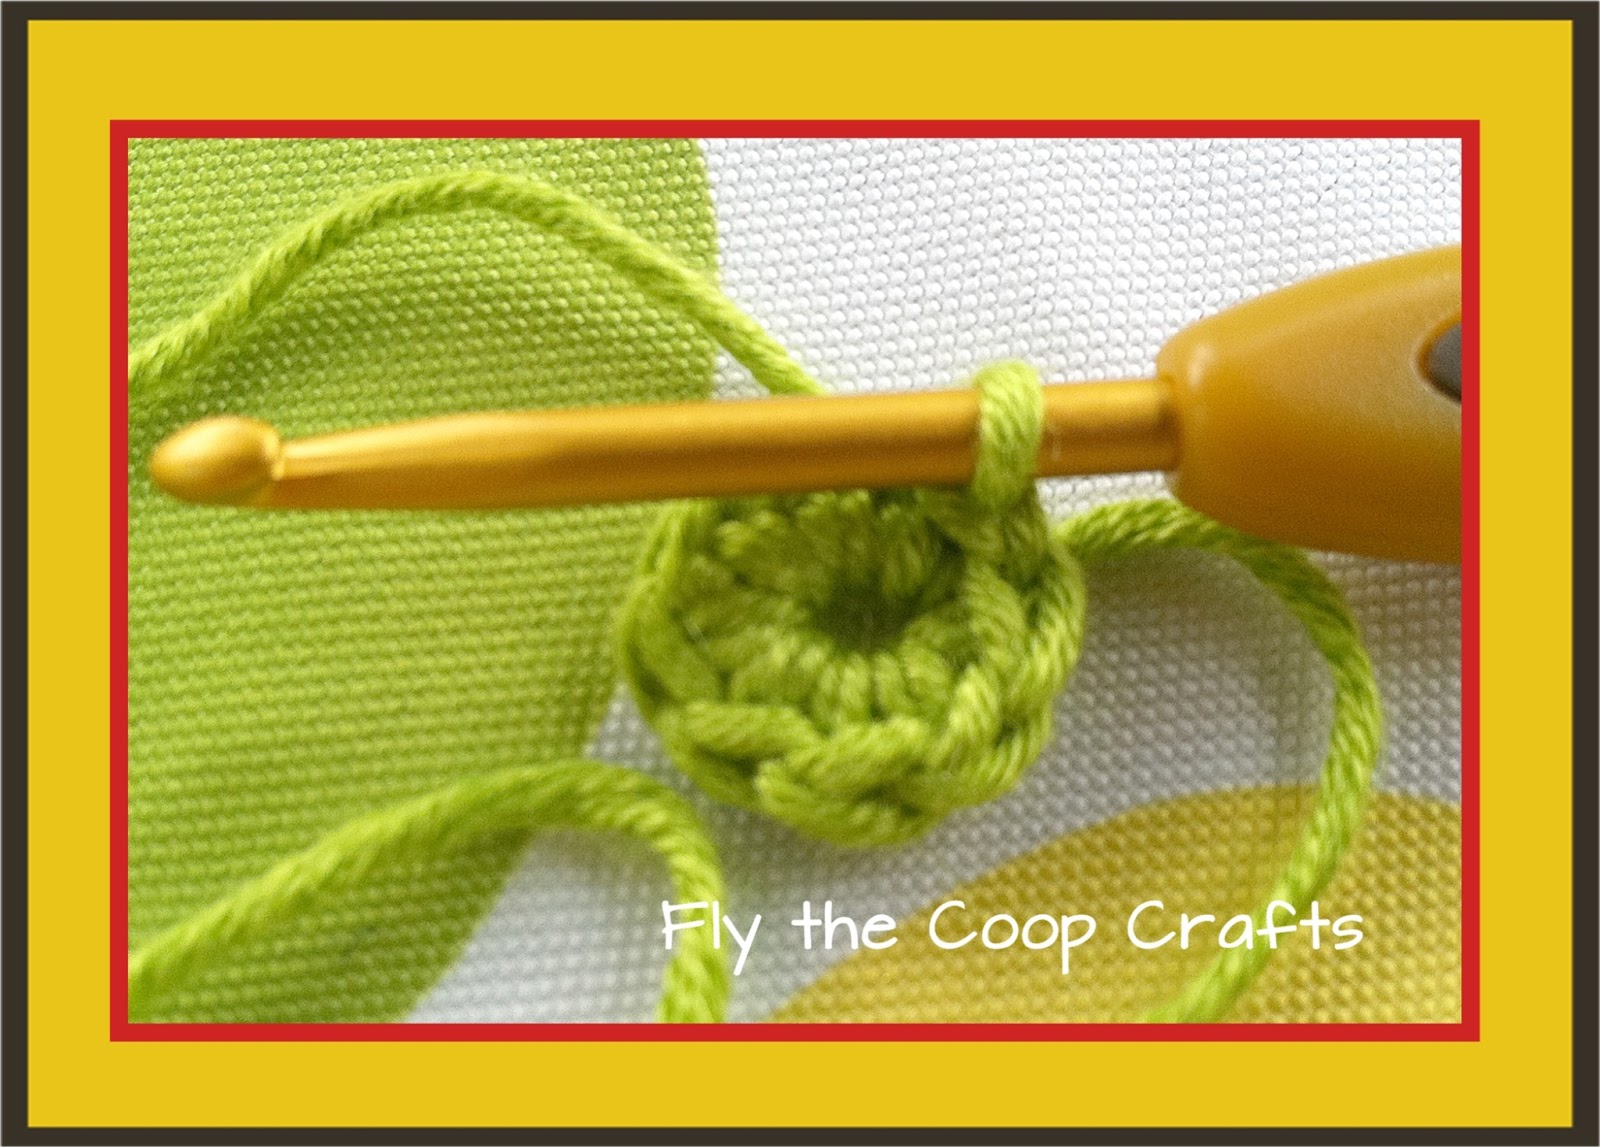
Make a magic (adjustable) ring.
chain 1, 8 sc in ring
Pull ring to tighten and join with a slip stitch. Round 1 complete.
ch2, then sc in same stitch as join (ex 1)
*Skip the next stitch (see ex 2). Then (sc, ch2, sc) in next stitch. Repeat from * 3 more times, then sl st to join the round.
You now have a bit of a square (sorry for the blurry photos - I was outside with an camera phone). Round 2 is now complete.
Perform the following stitches in the first ch2 space from the previous round: sc, dc, tr, dc, sc. That completes your first corner petal.
Now, you are going to "dip down" to the skipped stitch from the second round and slip stitch in there.
That kind of defines a stronger petal shape.
*Into the next ch2 space (sc, dc, tr, dc, sc), then sl st into the skipped st from round 2, repeat from * 2 more times. Finish off.
Ta dah! You have now completed ONE little star petal motif. Pull the center string to tighten the middle and weave in the ends (if you are good you will weave in NOW) - often I'm lazy and wait to the end. But it's easier to go on without little tails hanging about.
Next, grab another color and you will start right in on a second motif.
Complete Rounds 1 and 2 with the second color (pink in the example). When you get to round 3, complete ONE petal (petal = sc, dc, tr, dc, sc) and one dip down slip stitch.
Then, complete the first half of the next petal (sc, dc, tr). This is where you will make the join to the first motif. Joining the green and pink motifs will require a join to the top of TWO petals. I do the join on the second and third petals. To make the join, I follow the basic procedure used by Lucy at Attic24 in her "join as you go method." Basically - my method is the same concept. Keep in mind that each joining stitch in this coaster pattern uses a slip stitch as the joining stitch.
So as seen in example 1 above, I have made 1.5 petals on the pink motif. In example 2, I put the hook through the two loops at the top of the tr-stitch on the green petal. Yarn over with the pink and pull it through the green and pink loops.
In example 3 I have completed my first join and I have continued on to finish the rest of the petal by making a (dc, sc) in the same chain2 space.
Now, slip stitch into the skipped stitch from round 2. Then make another half of a petal (sc, dc, tr), then make the second join with the green motif (see example 4) finish off the third petal by making a (dc, sc) in that same chain2 space.
Slip stitch in the next skipped stitch from round 2, complete one more petal (sc, dc, tr, dc, sc) - no joining needed on this one and TA DAH! Example 5 shows two happily joined star petal flowers.
I hope that makes sense. Please feel free to contact me if you need further explanation.
Let's continue on.
The top left photo (above) shows THREE little motifs joined in a row. When you get to motif to the second "row" of motifs you will need to join each motif at THREE of its four petals points rather than just at two.
When I join three sides, I like to make 1/2 a petal, join, then complete the petal. Slip stitch (dip down), complete 1/2 of the next petal, join a second time (this time I join by going BETWEEN the joined space of the two motifs), then complete that petal. Dip down slip stitch, then make 1/2 a petal. Join one last time, complete the third petal, slip stitch and make a complete fourth petal all on it's own with no joining.
Remember a full petal is (sc, dc, tr, dc, sc) and a Joined petal is (sc, dc, tr, join, dc, sc).
Again, it's the same concept that Lucy describes in her join as you go method. My joins are always done with a slip stitch for this project. She clearly shows how to join on two sides and how to join on three sides. She joins granny squares but the concept is very much the same. My motif has only 4 corners, and no sides, so there are fewer places it needs to be joined.
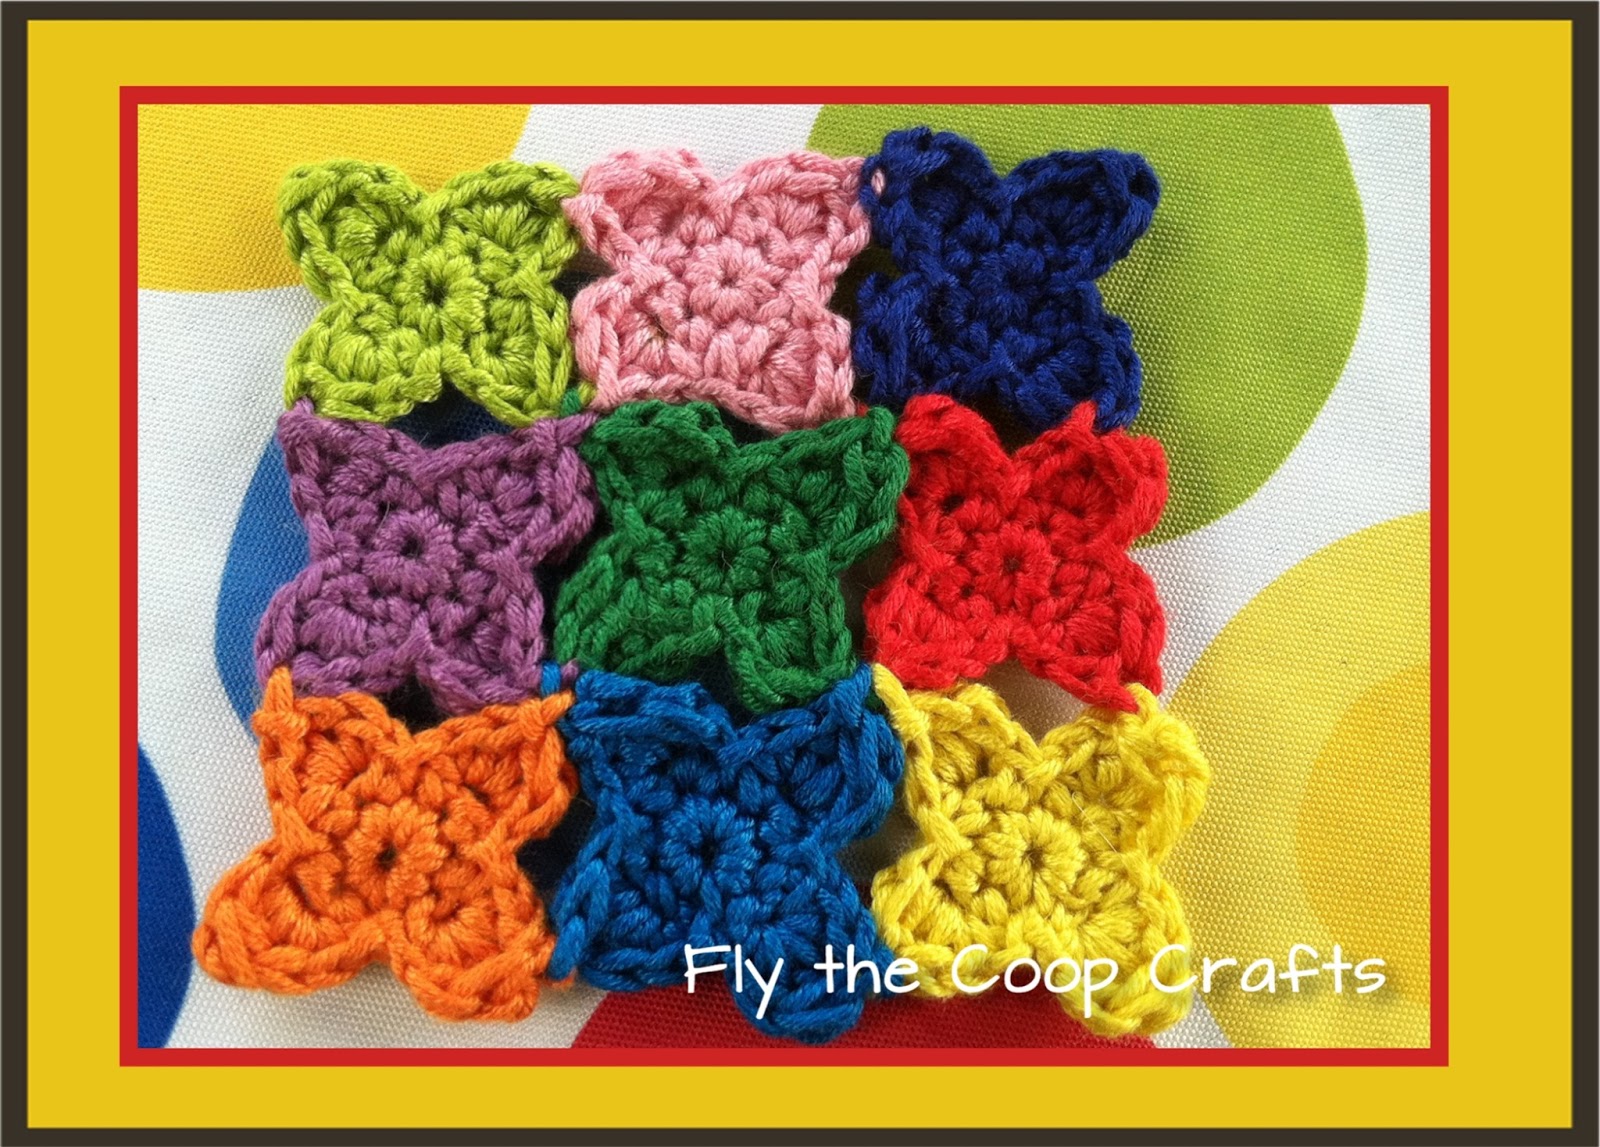
Make and join three more motifs until there are a total of nine! Voila! There you have it. A rainbow of tiny little star petal motifs all joined up together - three rows of three, a very nicely formed little square.
I decided that the motifs reminded me a bit of a stained glass window. That's when I realized I wanted a border around the outside edge. I came up with a really simple border - enough to just hold the square together and make it straighten out a bit.
Here's how.
Join a black yarn in any corner. 5sc in that corner. *ch2. dc into the same "dip down slip stitch" as in round 3 of the motif. ch2. dc over the join between the motifs. ch 2. dc, in the dip down slip stitch, ch 2, dc in the join, ch 2, dc in the dip down, ch2, 5sc in next corner. Repeat from * 2 more times. Now 3 sides of your square have a border. On the last side, follow the same pattern, but when you get back around to the first corner join the first sc (of the 5sc) with a sl st to close the round. Finish off and weave in all ends and clip them.
Easy, right?
And here's how that looks:
I love the way it seems like the flower motifs are floating inside the border, so unobtrusive!
Love it - and look how well it looks underneath of my icy cold water. By the way - the icy cold water was a MUST HAVE for crocheting outside today cuz it was H-O-T and H-U-M-I-D today in my corner of the world. YUCK.
Feel free to share photos of your stained glass coaster on my facebook page if you make one!
Ta ta for now - Sher
So the other day, I was scrounging around in our "art room," (a room in the house that has evolved from being a kid's art room and then changed to a music and recording studio for my teenagers and then changed to a bit of a storage area) and I came across this:
I'm not sure where it came from. I don't plan to make friendship bracelets with it right now so I wondered if I could use it to do something CROCHET...
It's kind of like embroidery floss but thicker and less "splitty." It comes with TWO EACH of every color you see pictured.
I thought it might be cotton but it's not - as you can see it's wool and viscose. Each tiny skein is just 3.28 yards. That's not much. The photo on the top left - the green squiggle there - well that's an entire skein!
so... I figured I'd have to get kind of creative with anything crochet. I sat down and created a little tiny star/flower motif... I joined them together and created a stained glass coaster.
The first one I created looked like this:
And I wanted to re-create it and photograph the steps for a tutorial and now I have.
I sat here today and worked it all out for you.
And now I will present the step-by-step photo tutorial for the stained glass coaster. (Amer. crochet terms)
Make a magic (adjustable) ring.
chain 1, 8 sc in ring
Pull ring to tighten and join with a slip stitch. Round 1 complete.
ch2, then sc in same stitch as join (ex 1)
*Skip the next stitch (see ex 2). Then (sc, ch2, sc) in next stitch. Repeat from * 3 more times, then sl st to join the round.
You now have a bit of a square (sorry for the blurry photos - I was outside with an camera phone). Round 2 is now complete.
Perform the following stitches in the first ch2 space from the previous round: sc, dc, tr, dc, sc. That completes your first corner petal.
Now, you are going to "dip down" to the skipped stitch from the second round and slip stitch in there.
That kind of defines a stronger petal shape.
*Into the next ch2 space (sc, dc, tr, dc, sc), then sl st into the skipped st from round 2, repeat from * 2 more times. Finish off.
Ta dah! You have now completed ONE little star petal motif. Pull the center string to tighten the middle and weave in the ends (if you are good you will weave in NOW) - often I'm lazy and wait to the end. But it's easier to go on without little tails hanging about.
Next, grab another color and you will start right in on a second motif.
Complete Rounds 1 and 2 with the second color (pink in the example). When you get to round 3, complete ONE petal (petal = sc, dc, tr, dc, sc) and one dip down slip stitch.
Then, complete the first half of the next petal (sc, dc, tr). This is where you will make the join to the first motif. Joining the green and pink motifs will require a join to the top of TWO petals. I do the join on the second and third petals. To make the join, I follow the basic procedure used by Lucy at Attic24 in her "join as you go method." Basically - my method is the same concept. Keep in mind that each joining stitch in this coaster pattern uses a slip stitch as the joining stitch.
So as seen in example 1 above, I have made 1.5 petals on the pink motif. In example 2, I put the hook through the two loops at the top of the tr-stitch on the green petal. Yarn over with the pink and pull it through the green and pink loops.
In example 3 I have completed my first join and I have continued on to finish the rest of the petal by making a (dc, sc) in the same chain2 space.
Now, slip stitch into the skipped stitch from round 2. Then make another half of a petal (sc, dc, tr), then make the second join with the green motif (see example 4) finish off the third petal by making a (dc, sc) in that same chain2 space.
Slip stitch in the next skipped stitch from round 2, complete one more petal (sc, dc, tr, dc, sc) - no joining needed on this one and TA DAH! Example 5 shows two happily joined star petal flowers.
I hope that makes sense. Please feel free to contact me if you need further explanation.
Let's continue on.
The top left photo (above) shows THREE little motifs joined in a row. When you get to motif to the second "row" of motifs you will need to join each motif at THREE of its four petals points rather than just at two.
When I join three sides, I like to make 1/2 a petal, join, then complete the petal. Slip stitch (dip down), complete 1/2 of the next petal, join a second time (this time I join by going BETWEEN the joined space of the two motifs), then complete that petal. Dip down slip stitch, then make 1/2 a petal. Join one last time, complete the third petal, slip stitch and make a complete fourth petal all on it's own with no joining.
Remember a full petal is (sc, dc, tr, dc, sc) and a Joined petal is (sc, dc, tr, join, dc, sc).
Again, it's the same concept that Lucy describes in her join as you go method. My joins are always done with a slip stitch for this project. She clearly shows how to join on two sides and how to join on three sides. She joins granny squares but the concept is very much the same. My motif has only 4 corners, and no sides, so there are fewer places it needs to be joined.
Make and join three more motifs until there are a total of nine! Voila! There you have it. A rainbow of tiny little star petal motifs all joined up together - three rows of three, a very nicely formed little square.
I decided that the motifs reminded me a bit of a stained glass window. That's when I realized I wanted a border around the outside edge. I came up with a really simple border - enough to just hold the square together and make it straighten out a bit.
Here's how.
Join a black yarn in any corner. 5sc in that corner. *ch2. dc into the same "dip down slip stitch" as in round 3 of the motif. ch2. dc over the join between the motifs. ch 2. dc, in the dip down slip stitch, ch 2, dc in the join, ch 2, dc in the dip down, ch2, 5sc in next corner. Repeat from * 2 more times. Now 3 sides of your square have a border. On the last side, follow the same pattern, but when you get back around to the first corner join the first sc (of the 5sc) with a sl st to close the round. Finish off and weave in all ends and clip them.
Easy, right?
And here's how that looks:
I love the way it seems like the flower motifs are floating inside the border, so unobtrusive!
Love it - and look how well it looks underneath of my icy cold water. By the way - the icy cold water was a MUST HAVE for crocheting outside today cuz it was H-O-T and H-U-M-I-D today in my corner of the world. YUCK.
Feel free to share photos of your stained glass coaster on my facebook page if you make one!
Ta ta for now - Sher
Subscribe to:
Posts (Atom)